[Servlet] Servlet
서블릿 환경 구성(Spring boot)
@ServletComponentScan
스프링 부트는 서블릿을 직접 등록해서 사용할 수 있도록 @ServletComponentScan을 지원한다.
@ServletComponentScan //서블릿 자동 등록
@SpringBootApplication
public class ServletApplication {
    public static void main(String[] args) {
        SpringApplication.run(ServletApplication.class, args);
    }
}
hello.servlet.basic.HelloServlet
@WebServlet(name = "helloServlet", urlPatterns = "/hello")
public class HelloServlet extends HttpServlet {

    @Override
    protected void service(HttpServletRequest request, HttpServletResponse response) throws ServletException, IOException {
    }
}
@WebServlet서블릿 애노테이션- name : 서블릿 이름
- urlPatterns : URL Mapping
- HTTP 요청을 통해 매핑된 URL이 호출되면 서블릿 컨테이너는 service 메서드를 호출한다.
[참고] HTTP 요청 메시지 로그로 확인하기
application.properties에 다음 코드 추가.
logging.level.org.apache.coyote.http11=debug
운영서버에 모든 요청 정보를 남기면 성능저하가 발생할 수 있으므로 개발 단계에서만 적용!
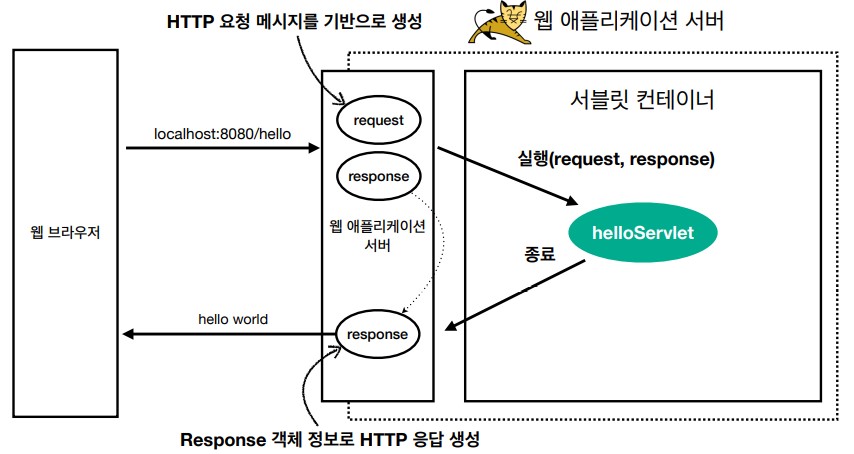
서블릿 컨테이너 동작 방식
[HTTP 요청]
GET /hello?username=world HTTP/1.1
Host: localhost:8080
[HTTP 응답]
HTTP/1.1 200 OK
Content-Type: text/plain;charset=utf-8
Content-Length: 11

hello world

[참고] Content-Length는 WAS가 자동으로 생성해준다.
welcome 페이지 추가
main/webapp경로에 index.html을 두면 http://localhost:8080 호출시 index.html페이지가 열린다.
<!DOCTYPE html>
<html>
    <head>
        <meta charset="UTF-8">
        <title>Title</title>
    </head>
    <body>
        <ul>
        <li><a href="basic.html">basic page!</a></li>
        </ul>
    </body>
</html>
댓글남기기